Two Build Days and a Few Evenings
Not much to say really just lots of really small jobs where we are tidying things up that will be easier now with the body off before we bolt it down for good. We have had the body fitting better now after we filed a lot more off the floor with a angle grinder, removed problem rivets along the chassis rail and with some sanding on the bottom of the tub but we still need to take more off which is really getting frustrating now. We've used some hard wood to fill the gaps at the front for the raised wishbone brackets and attached them with some tiger seal - very sticky stuff but we still managed to clumsily knock them off twice.
Coolant Hoses
After thinking about getting the engine running soon we thought we better finish the plumbing. Ordered some bits through Merlin Motorsport, who we would highly recommend as we had the parts the next day with spec sheets at a good price.
Frony hoses p clipped

Front T piece

We have had to re-route the bottom waterpump hose to avoid the propshaft and attached it to the drivers bulk head panel with the low oil sensor wire. We just need to finish the hoses to the coolant tank and the R1 is all plumbed in.
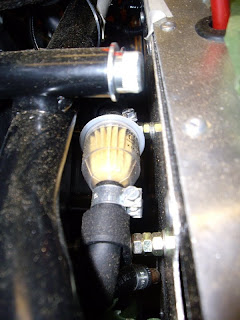
Fuel Filter and Pipe Work
With the engine in place this is definitely a tricky job as we have had to use 8mm fuel pipe to fit to the fuel filter to meet 10mm copper pipework making the fitment very tricky. We had to take quite a bit off of the flares on the pipes which is not easy when they are an inch away from a nicely painted engine. Once this was done we fitted the hoses with proper fuel clips and made a moutning bracket out of 2xM6 bolts(bolt of choice today!) with some nuts acting as spacers and with p clips on the end. The end of the hoses could then be pushed into the throttle body connections and tightened up. To secure the longest hose we attached it to the engine cradle as usual with p clips and rivets.

Rectifier
Without fully knowing where the scuttle would fit we had previously mounted the rectifier onto the scuttle. Having test fitted the scuttle were sure it will be in the way. We have relocated it using some aluminium sheet just like for the ecu/relays/sensors and fuses. 3 wires have been lengthened and then we bolted it to the new bracket with the M6's it previously used.

Battery Bracket Take 2
With the battery cables in we could finally finish this job we started early on, off. Because of the battery cables all routed in and now in the way we mounted it with bolts comming through the bottom to make easier to remove rather than using rivets like we had planned. Dad made a nice fitting top strap to go with the bottom one.

Exhaust
We had a look at fitting the exhaust today and for ease of fitment and replacement we have decided to make the cut out lareger in the bodywork to allow it to be fitted if all the headers are in the collector rather than fit them seperatly. The hole looks quite bad by itself but once the exhaust is in its really not that big plus it will probably be finished off with some edging trim. Although we had the exhaust together it is an almighty pain in the arse to fit. The headers need to slide in by a good few inches into the collector and the best we can do on one is an inch and even that is extremly difficult so all 4 seems almost impossible. We dont think this is just us as the collector pipes arent even straight or round plus we have general hand held tools so we are probably going to remove a tiny amount so they slip on easier and take them to a mate with a garage to see what we can do.

Gear Change Bracket
This was my Dad's big job of the day making a bracket strong enough to hold the gear change cable which pulls with quite some force. He bought some 3-4mm thick steel bar and has made two brackets for extra support by bending the bar in a vice with a rather big hammer. I had my doubts as the steel is not exactly thick compared to what i was thinking about, but as always he's always happy to prove me wrong and it seems to do the job although for a proper test we need the car on its wheels to check its operation.
Bracket attached to the bulk head panel

View of the cable going to the gear change lever on the engine

Horn
There are a few jobs now that really didnt need doing but seemed like the better choice between working on the drive fetling the body fit in artic cold winds or keeping the garage door shut - it was an easy choice! For the horn I've mounted it on the engine cradle as there was no where else near the horn electrics(fitted with the wiring) that wouldnt get in the way of the steering column. I've used M6 bolts tapped into the tube with large washers as the horn brackets are thin and flimsy so this might give it some more support. Then it was just a case of wiring it up, simple with two spade connectors.

Brake Fluid Resevoir and Hose
With the gear change bracket finalised and stealing as much bulk head space as possible we could attempt to fit the brake fluid resevoir to the bulk head panel. After another cheap buy from Merlin Motorsport and we had some Resevoir Hose in 6mm ID. We attached the flared copper tubes to the master cylinders with an adapter and then double flared the ends to enable us to fit the hose securely with a fuel pipe clip. This now allows us to attach the hose to the resevoir again with fuel pipe clips. First though we needed to make a bracket for the resevoir. This was made out of some aluminium with two holes in the bottom for outlets. To attach this I used M6 bolts throught the drivers bulkhead panel which is getting a bit crammed with stuff. To hold the resevoir in place on the bracket my Dad made an aluminium strap with some rubber padding to ensure it didnt pierce the resevoir as that definitely would not be good on the track! To tidy the bracket up its been painted with some satin black to match the chassis tubes.
I'l get a picture up soon as we have some fuel pipe clips that finish it off
Air Filter
This has definitely got to be one of my favourite jobs to date, no instructions included and none needed unlike the rest of the build :D Saying that we did have to wait a few months for the R1 air cleaners which are essential even though they are just a rubber ring to adapt the throttle body to the base plate. First up was cleaning everything so nothing got into the engine gubbins. Then I fitted the air cleaners to the base plate and tightened the jubilees to the throttle bodies. Its then just a case of fitting the 3 dzuz fastners to the base plate and locating the filter itself. The dzus pins then slot in and twist to lock. Very simple 5 minute job but looks great once fitted.
Filter mounted to the base plate

The fitted filter

Radiator Fan
For the rad fan we had thought about mounting this as recommended but fastning the fan through the rad with cable ties doesnt sound overly sensible. The rad does have 4 plastic tubes sticking out so we decided if we drilled them out and taped them to accept M6 bolts we could attach the fan with some aluminium brackets. Using some 2mm thick bar we cut 4 9cm sections them shaped them to size, drilled a hole either end then bolted the fan to them using cut down M6's with nylocs. Then to finish it off attached the brackets to the taped rad mounts and bolted it to the car
Heres the fan mounted to the rad

As you can see there is a fair bit of clearance and the fan doesnt touch the rad

Finally the fan and rad mounted to the chassis

We've put in an order for hopefully one of the last big expenses. We have ordered a set savage swithes(very popular in the kit car world) and a set of guages with matching sendors(smiths telemetrix series) for oil pressure, fuel level and water temperature. We found them cheapest from speedy cables. Reason we are buying another fuel sender is we didnt realise the one supplied wouldnt be compatible and as its the only one we received. We thought they would be universal but its only for Race Tech gauges but turns out they aren't
The reason there are so many spelling mistakes in the blog, family pet running wild!


